
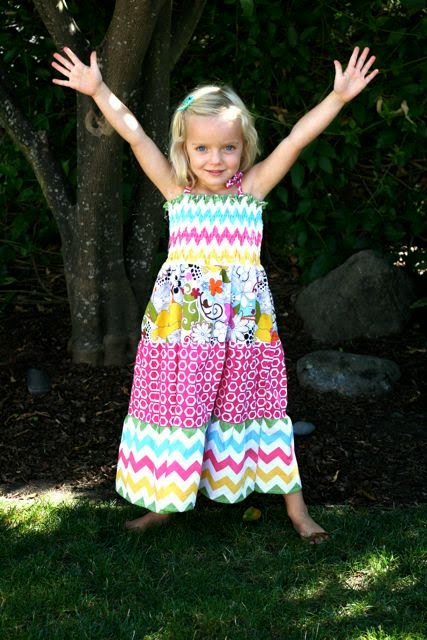
A few weeks back, I posted a picture of my little girl in her Fourth of July dress I made from scratch.

As promised, here is the tutorial...
It all started when a good friend gave me her daughter's favorite dress as a hand-me-down and said, "I wish my daughter could still fit in this. It is my absolute favorite dress of hers." Once my daughter tried on the dress, I could see why.

It's super light-weight, stylish, and yet cozy. Okay, here's the first picture I captured of her. As cute as I think she is, she is a big goof when it comes to taking pictures.

ANYway, I decided to figure out how to make this dress, a} because I love it and I wanted it in other fabric as well, and b} in hopes of making one for my friend's daughter who is 4 years older than my daughter. {Now, let's see if she reads my blog.} :)
Disclaimer: I've never copied a dress from another dress, and I'm self-taught when it comes to sewing, so for those of you reading this as pro sewers, feel free to leave comments to help me and others who might make this in the future. Also, my daughter is a petite 4 1/2 year old; the measurements I'll provide are for about a size 5 dress. As long as you know how to measure chest circumference and length, this is easy to adapt.
What you'll need:
2 yards fabric of choice
2 yards liner fabric
21" ribbon {1"-wide}
22" elastic {1/4"-wide}
elastic thread
white thread
thread of choice to match fabric for back bodice
Step 1: I traced half of the bodice top of the dress and enlarged it a bit to fit about a 5 year old. {As you'll see later, there is elastic in the top in the back so this leaves some wiggle room on sizing.}

I then laid out my fabric {$3/yard at Beverly's!},

found the center where I wanted the bodice to be {making sure I measured roughly from the bottom up so I wasn't cutting into the length/body of the dress},

folded the fabric in half, and cut the fabric with a rotary blade.

Step 2: Cut the same pattern out of white cotton for a bodice liner. Put right sides together and sew 1/4" seam. NOTE: My fabric doesn't look right sides together as it's not regular printed cotton.

Clip the seams along the curves to avoid the fabric wrinkling at the curves.

Turn fabric right-side out {optional: press with iron} and sew a 1/8" seam.

Step 3: Cut two pieces of fabric for the body - one for the front, one for the back. For my daughter's dress, the measurements are as follows:

I'm not sure why the back of the dress is 1-inch less in width - that's just how the original dress measured. Anyone know why this would be? Perhaps it makes the dress poof out just right.
Step 4: Cut the same fabric for the inner liner but shorten the length by an inch or two to avoid the liner coming out of the bottom of the dress. For this dress, I measured the length of the liner to be 19.5" instead of the 22.5" I used for the outside fabric.
Step 5: Hem the bottom seam of both the outer fabric and inner liner by folding the bottom edge of the fabric over 1/4" once, and then again, and sew.

Step 6: Set your stitch length to as long as it will go {basting stitch}. I have a "brother" sewing machine which means my settings look like this:

Quickly sew each individual seam about 1/2" from the top on the edge that will connect with the bodice. Pull the bobbin thread and gather the fabric until they both measure the length of the bodice. If none of this makes sense, check out this basic tutorial on how to gather fabric into ruffles or email me. Your final product should look like this.

Step 7: Pay attention here. I forgot to take a picture so this may seem confusing.
Mark/Place a pin at the middle of each piece of fabric and the bodice piece.
To join these three pieces together, lay your fabrics out as I have above, then flip the bodice horizontally and sandwich the bodice between the inner liner and the outer fabric, putting the right sides together of the bodice and the fabric body.
Pin the middle of all the pieces together, then pin the rest so that they end up the length of the bodice.
Sew a 1/2" seam.
If you have a serger {lucky dog}, use it here to close up the edges. If you are like me and you don't have a serger, use a zig-zag stitch at a short length but wide width {see below} or use pinking shears to trim the edges.

Then turn the fabric right-side out and admire the front of your dress!
Optional: At this point you can sew on a strip of ribbon across the seam between the bodice and the lower portion of the dress, as seen in the brown dress {see below}. I chose not to do this as I loved this fabric pattern and didn't want to cover it. Your choice!

 Step 8:
A little explaining... Jumping ahead for a second, I will use 1/2"
seams to sew the dress's back and front pieces together. This means the
front bodice will provide 12" and I'll need the back to provide about
10" for a final measurement of 22" to accommodate my daughter's 21"
chest circumference and to allow for a little room for growth. If you
are using your own measurements in making this dress, you'll have to
figure out the length of elastic you want to use here based on the
girl's chest circumference and the length of the front bodice.
Step 8:
A little explaining... Jumping ahead for a second, I will use 1/2"
seams to sew the dress's back and front pieces together. This means the
front bodice will provide 12" and I'll need the back to provide about
10" for a final measurement of 22" to accommodate my daughter's 21"
chest circumference and to allow for a little room for growth. If you
are using your own measurements in making this dress, you'll have to
figure out the length of elastic you want to use here based on the
girl's chest circumference and the length of the front bodice.
So, grab an 11" piece of 1/4"-elastic and find the middle of it. Pin it onto the middle of the liner fabric about 1/2-inch from the top and then pin the ends of the elastic to the edges of the liner. Fill in any additional pinning if you need it. {I did!}

Sew the elastic onto the liner, being sure to stretch the elastic as you sew.

Step 9: Cut a strip of fabric measuring 2.5" x 20" for the back of the bodice. Fold in half, length-wise with wrong sides together {and iron flat}. Mark the middle of the fabric at the bottom edge.
This part is kind of like Step 7. Mark/Pin the middle of the outer/back fabric. Layer the back bodice strip between the liner that now has elastic and the outer/back fabric, taking care to pin the middles of the edges all together.

Stretch out the elastic liner layer and sew the fabrics together using a 1/2" seam. You'll be sewing on top of the elastic strip that you sewed onto the liner.

Your final product should look like this:

Again, use your serger, a zig-zag stitch, or pinking shears to seal off the edges. Turn your layers right-side out and enjoy the back of your dress!
Set 10: Shirring. Ever heard of it? There are a lot of tutorials out there for it. My first attempt was a disaster so please play around with fabric scraps to make sure your settings are accurate before you sew this portion of the dress. The tutorials I found most helpful are from Make It & Love It {I don't adjust my bobbin tension but others swear by it} and Creative Heart. {Pay particular attention to loading the elastic thread into the bobbin without the needle plate cover. The elastic should feel like it's stuck in the bobbin holder.}. Again, nail this down before attempting the next portion of the dress.
Load the bobbin with elastic thread and the top thread with one you won't mind being seen on the back of the dress.

Sew your first strip of elastic 3/8" from the top of the back of the bodice. We will thread 1/4" elastic through this strip so be sure you don't sew to close to the top here.

Continue making strips of elastic until you reach the bottom of the back bodice, making sure you pull the fabric straight as you sew additional rows.

Step 11: Feed another 11" strip of 1/4"-wide elastic through the top hole of the fabric, being sure you don't lose the elastic on either end of the fabric.

Step 12: We're almost done. Line up the front of the dress with the back of the dress, right-sides together. Sew 1/2" seams up either side.

Again, serge, zig-zag or use pinking shears to close off the remaining edges. Now you're left with an almost-dress!

Step 13: Cut two 10.5" strips of 1"-wide coordinating ribbon. I chose to place the ribbons right before the downward slope of the front bodice. It's helpful to attach the ribbons in the back about 1/2-1" closer together to avoid the straps slipping down the shoulders.
Holding the ribbon down the inside of the dress, sew one edge of ribbon about 1/2" down from the top edge. Make sure that the bobbin thread is one that will show minimally on the front.

Then flip the ribbon upward and sew again, just along the edge, trying the follow the 1/8" seam you did in Step 2. The more ribbon you "hide" back here, the more you'll have to let out as the girl grows into the dress.

You're done! Last step is to present your cutie-pie with her new dress.


As promised, here is the tutorial...
It all started when a good friend gave me her daughter's favorite dress as a hand-me-down and said, "I wish my daughter could still fit in this. It is my absolute favorite dress of hers." Once my daughter tried on the dress, I could see why.

It's super light-weight, stylish, and yet cozy. Okay, here's the first picture I captured of her. As cute as I think she is, she is a big goof when it comes to taking pictures.

ANYway, I decided to figure out how to make this dress, a} because I love it and I wanted it in other fabric as well, and b} in hopes of making one for my friend's daughter who is 4 years older than my daughter. {Now, let's see if she reads my blog.} :)
Disclaimer: I've never copied a dress from another dress, and I'm self-taught when it comes to sewing, so for those of you reading this as pro sewers, feel free to leave comments to help me and others who might make this in the future. Also, my daughter is a petite 4 1/2 year old; the measurements I'll provide are for about a size 5 dress. As long as you know how to measure chest circumference and length, this is easy to adapt.
What you'll need:
2 yards fabric of choice
2 yards liner fabric
21" ribbon {1"-wide}
22" elastic {1/4"-wide}
elastic thread
white thread
thread of choice to match fabric for back bodice
Step 1: I traced half of the bodice top of the dress and enlarged it a bit to fit about a 5 year old. {As you'll see later, there is elastic in the top in the back so this leaves some wiggle room on sizing.}


found the center where I wanted the bodice to be {making sure I measured roughly from the bottom up so I wasn't cutting into the length/body of the dress},

folded the fabric in half, and cut the fabric with a rotary blade.

Step 2: Cut the same pattern out of white cotton for a bodice liner. Put right sides together and sew 1/4" seam. NOTE: My fabric doesn't look right sides together as it's not regular printed cotton.

Clip the seams along the curves to avoid the fabric wrinkling at the curves.

Turn fabric right-side out {optional: press with iron} and sew a 1/8" seam.

Step 3: Cut two pieces of fabric for the body - one for the front, one for the back. For my daughter's dress, the measurements are as follows:

I'm not sure why the back of the dress is 1-inch less in width - that's just how the original dress measured. Anyone know why this would be? Perhaps it makes the dress poof out just right.
Step 4: Cut the same fabric for the inner liner but shorten the length by an inch or two to avoid the liner coming out of the bottom of the dress. For this dress, I measured the length of the liner to be 19.5" instead of the 22.5" I used for the outside fabric.
Step 5: Hem the bottom seam of both the outer fabric and inner liner by folding the bottom edge of the fabric over 1/4" once, and then again, and sew.

Step 6: Set your stitch length to as long as it will go {basting stitch}. I have a "brother" sewing machine which means my settings look like this:

Quickly sew each individual seam about 1/2" from the top on the edge that will connect with the bodice. Pull the bobbin thread and gather the fabric until they both measure the length of the bodice. If none of this makes sense, check out this basic tutorial on how to gather fabric into ruffles or email me. Your final product should look like this.

Step 7: Pay attention here. I forgot to take a picture so this may seem confusing.
Mark/Place a pin at the middle of each piece of fabric and the bodice piece.
To join these three pieces together, lay your fabrics out as I have above, then flip the bodice horizontally and sandwich the bodice between the inner liner and the outer fabric, putting the right sides together of the bodice and the fabric body.
Pin the middle of all the pieces together, then pin the rest so that they end up the length of the bodice.
Sew a 1/2" seam.
If you have a serger {lucky dog}, use it here to close up the edges. If you are like me and you don't have a serger, use a zig-zag stitch at a short length but wide width {see below} or use pinking shears to trim the edges.

Then turn the fabric right-side out and admire the front of your dress!
Optional: At this point you can sew on a strip of ribbon across the seam between the bodice and the lower portion of the dress, as seen in the brown dress {see below}. I chose not to do this as I loved this fabric pattern and didn't want to cover it. Your choice!

So, grab an 11" piece of 1/4"-elastic and find the middle of it. Pin it onto the middle of the liner fabric about 1/2-inch from the top and then pin the ends of the elastic to the edges of the liner. Fill in any additional pinning if you need it. {I did!}

Sew the elastic onto the liner, being sure to stretch the elastic as you sew.

Step 9: Cut a strip of fabric measuring 2.5" x 20" for the back of the bodice. Fold in half, length-wise with wrong sides together {and iron flat}. Mark the middle of the fabric at the bottom edge.
This part is kind of like Step 7. Mark/Pin the middle of the outer/back fabric. Layer the back bodice strip between the liner that now has elastic and the outer/back fabric, taking care to pin the middles of the edges all together.

Stretch out the elastic liner layer and sew the fabrics together using a 1/2" seam. You'll be sewing on top of the elastic strip that you sewed onto the liner.

Your final product should look like this:

Again, use your serger, a zig-zag stitch, or pinking shears to seal off the edges. Turn your layers right-side out and enjoy the back of your dress!
Set 10: Shirring. Ever heard of it? There are a lot of tutorials out there for it. My first attempt was a disaster so please play around with fabric scraps to make sure your settings are accurate before you sew this portion of the dress. The tutorials I found most helpful are from Make It & Love It {I don't adjust my bobbin tension but others swear by it} and Creative Heart. {Pay particular attention to loading the elastic thread into the bobbin without the needle plate cover. The elastic should feel like it's stuck in the bobbin holder.}. Again, nail this down before attempting the next portion of the dress.
Load the bobbin with elastic thread and the top thread with one you won't mind being seen on the back of the dress.

Sew your first strip of elastic 3/8" from the top of the back of the bodice. We will thread 1/4" elastic through this strip so be sure you don't sew to close to the top here.

Continue making strips of elastic until you reach the bottom of the back bodice, making sure you pull the fabric straight as you sew additional rows.

Step 11: Feed another 11" strip of 1/4"-wide elastic through the top hole of the fabric, being sure you don't lose the elastic on either end of the fabric.

Step 12: We're almost done. Line up the front of the dress with the back of the dress, right-sides together. Sew 1/2" seams up either side.

Again, serge, zig-zag or use pinking shears to close off the remaining edges. Now you're left with an almost-dress!

Step 13: Cut two 10.5" strips of 1"-wide coordinating ribbon. I chose to place the ribbons right before the downward slope of the front bodice. It's helpful to attach the ribbons in the back about 1/2-1" closer together to avoid the straps slipping down the shoulders.
Holding the ribbon down the inside of the dress, sew one edge of ribbon about 1/2" down from the top edge. Make sure that the bobbin thread is one that will show minimally on the front.

Then flip the ribbon upward and sew again, just along the edge, trying the follow the 1/8" seam you did in Step 2. The more ribbon you "hide" back here, the more you'll have to let out as the girl grows into the dress.

You're done! Last step is to present your cutie-pie with her new dress.


If you end up making this dress, I'd love to hear feedback and see pictures of the dresses!
Next dress...
enjoy!
.molly