Friday, September 30, 2011

When The Duo Becomes a Trio

Two sweet, young girls in Santa Barbara are going to have a little sister any day now. To say they are excited is an understatement. 

As a special treat, their Aunt Amanda got them a Cookie+Curly mobile to dress up their room and to remind them that they both will be the Big Sister, and they will have a little one to help care for, love, and guide.

"The Addition"
Amanda and the Mama requested a driftwood-like branch for their birds, to match their beachy location.


This is actually a manzanita branch but because of its age and the cut of it, it looks like driftwood. {I just love how crazy and beautiful branches can be.}

And of course, the Big Sisters...


We hope the introduction of their new arrival comes soon, and health and laughter are shared by all.

What do you think of the hanging nest? Should I repeat it?

Working on some birds this weekend - Sorry it's been a while since I've had a chance to restock my website. Thanks for your patience, and of course, for letting others know about C+C.


Tuesday, September 27, 2011

Matchy-Matchy Pants

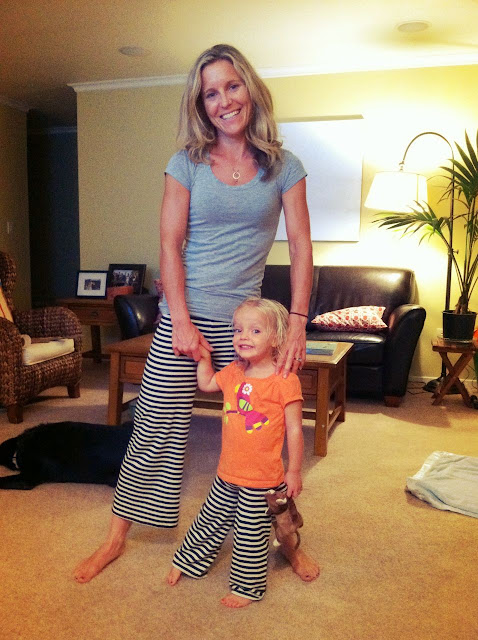
I still remember my mom making or buying matching outfits for herself and me when I was little, and the memory isn't always fond, but I couldn't help but make matching pants for my daughter and me the other week.


First, I haven't told you about this ridiculous find about an hour from me that sells fabric for $1/yard. Yes, you read that right. One dollar per yard. AND, it's self-serve - no one works there. AND, it's on the honor system. I'll fill you in on the details on a later post, or email if you just have to know now - {P.S. It's only open Fridays and Saturdays}.

The last time I went to this "fabric store" I got two yards of this striped black and off-white fabric. I intended on just making pants for myself - actually, I planned on making a super cool skirt but I didn't have enough fabric - but when I made a minor mistake for my pants, I ended up having enough fabric to make my sweet daughter some pants.

When I made the pants for myself, I drew a tiny bit from a previous post I did for t-shirt pants for my little one, but I adapted it a) for my adult size, b) a little bit as the waist on those pants ended up being really gathered {neither she or I have much hips - thanks genetics} and I was looking for more of a fitted/lounge-pants look, and c) to make them longer.

{The How-To Part}

I measured my waist, my inseam, my "outseam" {I don't know the technical term but the length from the top of my hip to the floor}, the width of the bottom pant leg on some other pants I have, the crotch {waist to inseam}, and the diameter at the thigh/crotch area. I then just transferred those measurements onto the fabric, making sure to line up the stripes properly. {Some people find stripes hard to work with. I appreciate that they don't allow me to fudge and force me to be accurate with my work.}

The pattern ended up looking like this:


Note: a) If you make these pants, make sure you cut the fabric on the fold where the outer leg is on the fold and you have to sew up the inseam. The measurements I wrote down assume the fabric is folded in half. b) I added a few inches in the crotch {waistline to crotch} measurement to allow for fabric to be folded down and enclose the elastic. Make sure you add the appropriate amount of inches of the "outseam" to allow for the waistline as well.

I folded down the waistline but added about 0.5-1" on the back side to allow for booty room. :) Then I made a similar gap for elastic that I did in the t-shirt pants tutorial, but this time stretched the elastic and sewed right on the elastic so the fabric would gather neatly.

I folded down the hemline 1/4" and then another 1/4" and did a simple stitch along the bottom. Next time I might do a zig-zag stitch here as sometimes the hemline rolls up.

{How I Got Two Pairs of Pants Out of This}

For some reason, I cut my inseam 5" shorter than I wanted {24" instead of the 29" I measured} so I had enough fabric to make another pair for my mini-me. Since she's potty trained {yay!} I measured her waist, booty, thigh, inseams and crotch area and made the same pants, only smaller.

I now get why my mom did what she did when I was younger. :) Have you made any mother-daughter matching outfits?? Do share!


Monday, September 26, 2011

One Heck of a Outdoor Chandelier

My husband and I have the privilege of getting together with four other couples every other month for a Gourmet Group dinner party. We don't have a fancy name or anything. We just all love making food or eating it... or both.

This month we hosted the dinner at our house and had a Greek theme to the evening. I will get into the food {and outfits} in a later post - it was amazing, as usual - but I have to highlight this amazing chandelier that my husband made on a whim with my branches. 


It's more of a floating centerpiece that doubled as lighting for us.


It was so neat to dine under this with friends and enjoy the warm glow of overhead candles while a slight, warm{ish} breeze blew and God held off the rain for us. Such a delightful touch to the evening.

I look at it now and think we could sell these through Pottery Barn or Restoration Hardware for $450 or so. What do you think?! :)

Signed,

Proud Wife

Wednesday, September 21, 2011

The Little Skirt

My son's school is in need of some more dress-up skirts so I volunteered to make a couple for the 3-year olds. I had never made a toddler skirt before but I wanted to learn how as my daughter loooooves "twirly skirts". {I wish you could hear the way she says that - it's just so cute!}

One request from the school was to have some more, um, "boy-geared" skirts as the boys like to get in on the dress-up action just as much as the girls. {I mean really, who doesn't like to twirl?!} So I took my kids to Beverly's and they both got to pick out their choice of fabric for the two skirts. This first skirt is from my son's choices...

Sneak to the bottom to see what he really thought of it at first!
Supplies:
* two 1/2-yards of coordinating fabric
* 21-inches 3/4-inch elastic {I wanted the finished waistline to measure 20"}
* coordinating thread

1) Cut top {in my case, checkered} fabric into 6" tall by 30" wide.

2) Sew short sides together using 1/4" seam. Press the seam open.

3) Choose a top and bottom to the fabric and turn down 1/4" seam at the top. Repeat and turn 1" down.

4) Sew the fold down, being sure to leave a 1.5" opening at some point.


5) Feed the elastic through the opening and thread the elastic through the waistline.
6) Overlap the elastic by 1/2" and stitch the ends together. This is where I've found this stitch to be particularly helpful:


The top of your skirt will be done at this point. There are a lot of options now in regards to design. I wanted a country look, to match the fabric, so I proceeded to...

7) Cut TWO sheets of bottom {in my case, patterned} fabric to 30" wide by 9" tall. You'll need TWO. Sew the shorter sides together and press seam open.

8) Sew a basting {long, lose} stitch around the top edge of the bottom/patterned fabric. Pull the bottom/bobbin string to gather the fabric. 


{General rule of thumb is to use twice the fabric length for your final fabric measurement. i.e. We want the fabric to gather to the length of the top/checkered fabric length of 30" so we're using 60" of fabric to gather.}

9) I pinned the "wrong" sides together at this point because I wanted to raw edges exposed, for the country look. 

 
In hindsight, I think I would rather have the bottom/patterned raw edge exposed but keep the top/checkered edge hidden. Thus, next time I would pin the wrong side of the bottom/patterned to the right side of the top/checkered, leaving a 1/2" seam.

10) Sew the bottom and top fabrics together, staying just off to the side of the basting stitch. Pull the thread from the basting stitch out.


11) Turn 1/4" of the bottom hem over. Press and/or then fold over again and stitch close the bottom hem.


12) Cut 2" wide strips of top/checkered fabric. I wanted to make a tight, gathered hem here so I used about six fabric strips of 2" wide by 30" long.

13) Run a basting stitch along the fabric, just off the center of the fabric. {When you sew the strip onto the hem, you'll want to sew in the middle of the strip.}

14) Gather the fabric by pulling on the bottom/bobbin thread to your desired tightness. Pin.

15) Sew gathered fabric onto the skirt, sewing down the middle of the strip. Pull out the thread from the basting stitch when you're done.

And...

"Boys don't wear skirts, mom!"
A fun little country skirt for dress-up, hanging out, or going out. Really, these basic measurements and steps open the door to many skirt possibilities.

I'm making a different skirt from my daughter's fabric next - Really excited about this one! What toddler skirts have you made??


Tuesday, September 20, 2011

Enhanced Rice Krispie Bars

Every year our church, Grace Church, has the privilege of hosting the Women's Overflow Shelter in the Fall. This means, we get to designate a portion of our campus to temporarily housing women who find themselves without a home. 

My friend Susan and I get to spend time with the ladies tonight before they retire to their beds - helping with their kids, lending an ear, sharing about our Provider {of comfort, rest, joy, love, peace...} should they desire to hear about Him, and just chatting.
We want to bring them some goodies they could enjoy so I've made them so scrumptious Green Pumpkinseed and Cranberry Crispy Bars that I found in Cooking Light's 2007 Annual Recipe Book. The recipe adds a list twist on the average Rice Krispie bar which is already super yummy. I'm not sure I'll be able to go back to it though after tasting these!


I *did* use EarthBalance butter spread instead of butter. I wonder if you can add ground flax to them?? Let me know if you try it.

A bonus: they don't really go bad for a while so they pack well in lunches, or they'll be great for the ladies tonight should they decide to save them for later.

Please place these particular ladies in your prayers tonight - that they may be blessed during their time at Grace Church, and that they experience His grace while they are there.


Friday, September 16, 2011

Superhero Mask Tutorial

I think it's so interesting how concepts get picked up outside the house, and we are then stuck with them! This can be good, and bad.

An example of good: My son and daughter go to the same preschool {Grandmother's House Children's Center in SLO, CA} and they came home one day and sang the sweetest prayer before dinner. It was simple: 

"Hands, hands, hands. 
Thank you God for hands. 
Food, food, food. 
Thank you God for food. 
Friends, friends, friends. 
Thank you God for friends. 
Amen. Amen. Ameeeeeeeen!"

I mean, the sweetest thing ever. No complaints here!

An example of bad... Well, I won't give you the specifics of when my dear, sweet son dropped an "F-bomb" as part of a statement he heard somewhere. {VERY doubtful from school!} But there's just stuff that they inevitably see {billboards, books, friends, school, people, grocery store, life} and it sticks with them.

Right now, it's Batman for us. We've never had a Batman book, or Batman Band-Aids, or videos or anything, but right now our little dude is stuck on Batman. And, since he already has a cape, he needed a mask. Thus:


I got the template for the mask on "first palette - Your step-by-step guide to kids' crafts". Yes, a site I just discovered but all parents and grandparents should know about. But, since I'm in love with fabric and sewing, I wanted the mask to be more than just colors on paper. 

So, here's what I did:

1) Cut out the pattern, or draw your own and cut it out.


2) To give the mask some thickness, fold two layers of iron-on fusible webbing and trace/cut or use your rotary blade to make two layers of the mask with the webbing.


*If your image isn't reversible, make sure the webbing is facing the right way {the side you iron onto fabric is bumpy} so that you can iron the webbing onto the fabric and have them face each other when placed together. You'll see in a sec.

3) Iron the webbing onto the fabric following the product's directions, then cut out the pattern but leave about 1/4" border.


4) Cut two 15-20" strips of your ribbon on choice. We stuck with Batman colors and chose a wide yellow ribbon. {You can also make a strip of fabric for this purpose too.}

[Addendum: Since making this superhero mask I realized that the kids might enjoy a more instant-gratification model - that is, a mask that doesn't involve the help from mom or dad to put on.

For my daughter's mask I used a 9-inch piece of 3/4-inch elastic and a 20-inch strip of ribbon. I pinned the elastic on each end of the ribbon, and also in the middle:


I then sewed the elastic onto the ribbon, slowly feeding the two through the machine using a zig-zag stitch, not stretching the elastic until I could grab the two from the back. Once I could, I stretched the elastic to the halfway point and pulled the ribbon/elastic out from the back to help progress the ribbon along. This produces a gathered ribbon for a final look like this:


This way, when it falls off - and it will - mommy or daddy doesn't have to be there to put it back on. I'm going to switch my son's to this style too.]

5) Place the two fabrics webbing-sides together and position the ribbons/fabric strips where they'd work best for later tying the mask onto the toddler's face. I did two rows of a basic stitch close together to secure the ribbon onto the mask.


{This is where, if you don't have a reversible image, you want to make sure you webbing image goes on the correct side of the fabric so that, when you put them together, it's a two-layered mask. Does that make sense? If not, email me.}

6) Do a close zig-zag stitch around the edges of the entire mask and eye-holes.


7) Chose the desired length of your ribbon, cut. Use a match to heat-seal the edges of the ribbon to prevent fraying.

8) Give it to a toddler and watch their imagination go wild! :)


Do send pics if you decide to make this. It's super easy and goes a long way. At least until the next thing gets stuck in his little brain. :)

If you were a superhero, what color would your mask be?? Mine: orange.

P.S. I made this for my 4-year old but it also fits on my very petite 2-year old {and yes, I'll admit it fits me pretty well too!} so it's pretty versatile for any age. 

Thursday, September 15, 2011

The Versatile Blogger

Last week, Emily, from Blue Corduroy, nominated Cookie+Curly for the Versatile Blogger award!


First, Emily is a kind, creative, naturally glowing, sweet person. Go read her blog and check out the sweet things she makes. So neat.

Now... An award?! How fun! Well, I didn't win anything. Just nominated, and these are the rules {notice: we are ALL winners!}:

1. Thank the person who gave it to you and link back to them in your post. {Thank you, Emily!}
2. Share 7 things about yourself.
3. Nominate 15 blogs you have recently discovered.

It's basically a cool way to learn a little more about the blog you are reading, and what blogs that blogger has been enjoying lately. So without further ado...

7 Things Most Don't Know About Me

1. When I eat cereal, I have to have at least 3. Then I pat down each cereal after I pour it in. {Don't worry, I started with the weirdest one first.}
2. I was a gymnast as a kid and can still do a round-off back handspring.
3. I love to hear the vibration of my husband's voice on the back of his neck when he sings.
4. I trusted Christ as my Savior alongside my family's couch when I was about 5.
5. I need to have peanut butter every day. Need.
6. I lived in Florence, Italy for 8 months during my sophomore year of college.
7. One of my biggest fears is the open water, yet I love scuba diving and triathlons. {This is when Bible verses come in handy. Over and over.}

15 Blogs I've Recently Discovered

1. It's Just One Foot in Front of the Other ~ On the Trail of My Life
2. retro mama
3. Stardust Shoes
4. Miss Mustard Seed
5. weinerdog tricks.
6. Sew Much Ado
7. MADE
8. the Purl bee
9. Mis Pensamientos
10. Feed Between the Lines
11. Life Rearranged
12. In Erika's Kitchen
13. the pleated poppy
14. simply joy
15. Scrapbook Society / lollipops

Happy day to you all!